I'd like to apologise for not uploading the drafts for my essay on "What factors drive the technology?" which was uploaded on 01/12/13. The first draft/part 1 consists of the 10 ideas I originally had in mind to talk about, and how I ended up choosing this topic area to look into further. In addition to this, I also looked at how I could structure the essay in a concise, easy-to-follow manor.
Draft 1:
Possible areas to look into:
1-The growth of FPS games.
2-What aspects drive the technology forward? (Mr Powell's suggestion)
3-What are the biggest companies and how did they arise?
4-Consistent sellers & why are they are so popular?
5-Different means of controlling games e.g. Motion sensors, controllers, mats, voice, mind.
6-Where is the industry heading?
7-The relative costs of making games Vs. How much they make
8-Explore different ways to make & animate game assets e.g. Scanning, motion capture, by hand.
9-Why are games so much more popular with the younger generation?
10-Explore the different genres of games and come up with a new concept which could sell.
These were the 10 ideas I jotted down after hearing the presentation on what we need to do. My thoughts are that I'd have to distill these to my favourite ones/the ones I'd enjoy doing the most. These were: 2, 5 and 10.
I loved the idea of looking into all of the different ways we can control games and how we can use these for other applications too, not just games. For example, how there are some games which require a headset to read signals from the brain and use them as controls. Although, this technology in itself could have other uses around the house, or be used by people with paralysis. I also liked the idea of researching all of the genres of games and looking at what sells. Then, after putting together some results, drafting a new concept for a game which could be fun yet competitive, looks good, and would sell to a large market.
However, I ended up choosing the driving factors of the technology because it meant I would be able to gather a reasonable amount of resources/information, as well as call upon my own personal experience to write an interesting and concise essay. In addition, I thought it would be a nice topic to choose since it allowed me to cover many things at once, not just one.
At this stage, I didn't want to look for resources because I needed to first come up with all of the points I felt were relevant and distill those, before looking for evidence to back up what I am saying. Therefore, the things I say are my opinion, but also have some factual evidence to base them off to give them value.
I always like structure, so I did the old-school thing and drafted the layout for my essay.
Structure:
-Introduction leading to first point.
-Point #1 + elaborate + show evidence + link it back + Images
-Point #2 + " "
-Point #3 + " "
-Point #4 + " "
-Point #5 + " "
-Any additional points I'd like to make
-Summary/Conclusion
-Bibliography
This is the standard structure and fitted perfectly with this type of question.
-----------------------------
Once my mind was made up on what I wanted to look into further, I went about writing bullet points of interest & important factors I need to consider for this question. These points were then ordered. With 1 being the highest influence and 6 being the lowest influence. Alongside this, I gathered some relevant resources and formed the arguments backed up with information.
Draft 2:
What are the factors? - Brainstorming the key points
(I couldn't help what I always do which is to get rid of anything which isn't really relevant and write down most of the main points only)
1-The technology itself? As the technology gets better and better, we know there is always room for improvement and our desire to improve therefore keeps the development going. For example, in terms of visuals, we can only make them better if the technology can cope with the information it has to deal with in order to display them. If we have more memory to utilise, we can produce better graphics and thus, development. #4
2-Some people see gaming as a need. Obviously this is untrue because we don't exactly need it to live, but what we really need is stimulation. Games provide us with audio, physical and visual stimulation resulting in a very good way to keep our minds entertained and active to a certain extent. Not to mention they are fun to play and is a good way to unwind/relax which we definitely need to do from time-to-time. Aside from this, it has also become a part of our lives and is expected to stay. #6
3-Money. Plain and simple. If the industry wasn't generating much profit, then not as many people would bother to get involved and make it better. In addition to this, once a franchise has been established, money is then re-invested in making the next one bigger & better than the previous; in the hopes of generating even more profit. #1
4-The amount of money generated can be influenced by competition in the market. If another company has a similar product to yours, you want to make sure yours stands out as 'top dog', right? Therefore, they will do as much as they can in order to improve on the product, again, resulting in constant development of the technology. #2
5-People always want more on top of what they already have. Therefore, as soon as the next big 'revelation' comes and astounds people, in a couple of years time they'll be wondering when the next thing will come to replace it. This means if no-one fills this demand, there'd be a big empty space in the market until someone else comes along and fulfills it. #3
6-Changes & new ideas keep the ball rolling. If a new idea pops up and it seems like it has potential, money will be invested in that, and this money is a gateway into improvements, keeping ball rolling. #5
A common theme is the bottom line for developments to occur... Money. Without it, we cannot progress. Our imaginations and desire for more contributes, but it wouldn't cause the speedy advancements we are currently making without the money.
Gathering resources:
-Just putting together a list of sources I'll most likely use for the essay.
-http://www.kickstarter.com/projects/1944625487/omni-move-naturally-in-your-favorite-game = Omni-directional treadmill for games.
-New electronics. (26th June 2012). From Pong to Wii: four decades of computing gaming. 2-4. = Article on Gaming, can use for information on storage size/history.
-http://www.escapistmagazine.com/forums/read/7.410369-ESA-Study-Finds-Women-Make-Up-Nearly-Half-of-Gamer-Population = Information to back up point.
-http://www.rockpapershotgun.com/2011/10/31/the-gadget-show-plays-bf3-better-than-you/ = Amazing way of controlling the character.
-http://gadgetshow.channel5.com/gadget-show/gadget-news/up-close-with-the-battlefield-3-simulator = Add-on to point about new technology.
-http://www.computerhope.com/jargon/d/diffengi.htm = Difference engine.
-http://www.crews.org/curriculum/ex/compsci/articles/history.htm = Computer history.
I of course had more references, but these were the ones I initially started with and I built the essay from this point on. I felt like I had a good starting point and could go ahead with writing it.
For the full essay, click the link:
http://markeastlanddmuga.blogspot.co.uk/2013/12/dmuga-assignment-3-what-factors-drive.html
Monday, 14 April 2014

DMUGA Week 27 - Trip to Guildhall, UDK doesn't like me & Game art conference day!
As we've come to the end of this week (and the end of term 2), time doesn't just slow down, if anything... It speeds up! It is Easter time, but unlike the Christmas holidays in which I took 2 weeks off, I'll only take 1 week off this time as there is so much to do! A very interesting week yet again though, from the trip to Guildhall, to the Game Art conference day:
Monday - Visual Design
Having just visited Bradgate Park and the National Space Centre again, it was nice to see a new interesting place to draw, with a different atmosphere/feel to it. During this day we went about as normal gathering some texture photographs and quick thumbnail sketches from different places to get a sense of composition/perspective. I love the way the building looks, although the structure is rather 'weird'.
Here's some of the 5-10min thumbnails I did on the day: I later went back to get a line drawing for the final piece of the outside and get my perspective lines neatly drawn in + any details on the building - I got quite peckish so decided to finished the shading off at my flat instead.
However, seeing as I need a lot of practice in digital painting and having seen the amazing ones done by a previous year's group, I went ahead and spent a rather a lot of hours trying to get a 'decent looking paint. As I'm new to this, I know there are so many different ways to go about painting and have tried the 'line drawing + colour' method for the vehicle project (which turned out very vibrant), I decided to try the grey-scale to colour method this time. I think this produced a far better result and I personally favoured this because it meant I could control the values of a whole general area and not worry about the colour. Until I get a good understanding of how to use the right colours/colour pallets, I think the grey-scale method will be my preferred choice for now.


For this, I used 2 brushes, 1) The standard Ps chalk brush 2) One I found online which is a tree branch - I know it's random, but I felt it added some texture to it; this aspect of adding texture is another thing I need to move towards as it can create a much more depth/atmosphere. Even though I have spent far longer on this than I did on the others, it is a whole lot better than my other digi-paints to this point and I hope to continue making progress in this way.
Tuesday - Game production
Oh my, 7 hours worth of work... 1 hours worth to show for it. There really ins't much that can be said about today. I spent literally hours trying to get the collision mesh for my building to work and in the end I just gave up as it wasn't worth the time investment. I'm still stuck with this problem:
It only occurs if I add any more geometry to the collision mesh itself. The secondary problem was the van's smoothing groups not showing when I went to re-size it in 3DS Max. Obviously I exported it into UDK with smoothing groups but they weren't showing in UDK, so this caused a lot of trouble and a couple of hours wasted and decided again that it isn't worth the investment.
The whole day wasn't a complete waste though, I now have the majority of a collision mesh for my building and fixed the texturing problem for the van & trees. I also imagined some other assets I'd like to create over the Easter break to make it more interesting but you'll have to wait and see what it is when I come back! Hopefully it'll turn out well, I have high hopes but may not get the time to do it all.
Wednesday - Game Art conference day
I wasn't too sure of what to expect from today, as I thought it would just be a couple of sessions advising us on how to go about what information to put in and how to lay it all out properly. However, it was far more helpful than initially thought because we actually did some activities to get us thinking about it in a new way.
The sessions I attended were:
-Word art: Using words creatively
-Shaping your writing
-The tools of visual practice
-Have a go!
To quickly summerise the sessions, I enjoyed all of them collectively, although, I definitely found 1 in particular much more helpful than the others.
'Word art' consisted of analysing an artist's image and trying to think more creatively about how we use words to describe artwork. I'll be honest, it was alright but it wasn't anything 'new' to me and didn't see how it will influence my future blogs.
'Shaping your writing' was initially random for me and I didn't see how it would help with my blogs, however, after the message "Convey a main point to the reader through your use of writing and images", I realised that it is important to focus on a couple of important things only and keep it easy-to-follow. Coming up with a short comic strip was rather interesting and it yielded a funny result but has good meaning behind it.
'Tools of visual practice' was the most helpful session by far as it demonstrated a new way that I hadn't considered before which helps drastically in imagining a scene and being able to describe it in-depth, without thinking too hard about it. I most definitely will use this technique and I think I get produce good things with it. Not to mention the mind-blowing concept art that Mitch created within 2 hours... Literally jaw dropping and I must know his method of digital painting!
Finally, 'have a go!' was just to finish up the day by looking at what still needs to be done before the submission date, but also to look into where my blogs are weak/lacking and hopefully improve them for future posts.
Personal Work
As I mentioned earlier, I wish to improve greatly in digital painting and in order to combat this, I have spent many hours looking into as many different methods that other people use to get a good result. My thinking behind this is: To observe how greatness is achieved, adopt a preferred technique, and practice endlessly. Chris recommended I looked at Feng Zhu's work as he also has many tutorials... I have to say that it blew my mind how fast these concept painting are made and to a very high standard. From watching some of his videos, I think I'd like to start small and to do this I'll just work in grey-scale and try and design things from silhouettes, then add details using the values. By doing this I don't have to worry about colour yet, but I can still get the hang of working in this manor, plus, if it turns out well I'll build confidence. So, I am setting this for me to do in my spare time and it will be (at this moment) the main task over the summer. By the end of the summer I want to be in a position where I am confident that I can produce some sort of 'decent' concept art if asked to.
In addition to this, I'd like to just have mini projects for myself in 3D. For example, go out and model my whole garden which will give me practice in foliage. Or, better yet, model something for someone else! My dad has requested that at some point I model one of his motorbikes; this will also give me more practice in vehicles and give me a texturing challenge with the metallic textures.
Anyway, I wish you all a lovely Easter and get a well deserved 1 week off! Blogs will continue when I go back to DMU. See you all soon :)
Monday - Visual Design
Having just visited Bradgate Park and the National Space Centre again, it was nice to see a new interesting place to draw, with a different atmosphere/feel to it. During this day we went about as normal gathering some texture photographs and quick thumbnail sketches from different places to get a sense of composition/perspective. I love the way the building looks, although the structure is rather 'weird'.
Here's some of the 5-10min thumbnails I did on the day: I later went back to get a line drawing for the final piece of the outside and get my perspective lines neatly drawn in + any details on the building - I got quite peckish so decided to finished the shading off at my flat instead.
However, seeing as I need a lot of practice in digital painting and having seen the amazing ones done by a previous year's group, I went ahead and spent a rather a lot of hours trying to get a 'decent looking paint. As I'm new to this, I know there are so many different ways to go about painting and have tried the 'line drawing + colour' method for the vehicle project (which turned out very vibrant), I decided to try the grey-scale to colour method this time. I think this produced a far better result and I personally favoured this because it meant I could control the values of a whole general area and not worry about the colour. Until I get a good understanding of how to use the right colours/colour pallets, I think the grey-scale method will be my preferred choice for now.
Initial quick sketch
Blocked in some values
Value correction
Added details
Final - Added colour
For this, I used 2 brushes, 1) The standard Ps chalk brush 2) One I found online which is a tree branch - I know it's random, but I felt it added some texture to it; this aspect of adding texture is another thing I need to move towards as it can create a much more depth/atmosphere. Even though I have spent far longer on this than I did on the others, it is a whole lot better than my other digi-paints to this point and I hope to continue making progress in this way.
Tuesday - Game production
Oh my, 7 hours worth of work... 1 hours worth to show for it. There really ins't much that can be said about today. I spent literally hours trying to get the collision mesh for my building to work and in the end I just gave up as it wasn't worth the time investment. I'm still stuck with this problem:
 |
| Collision mesh works for everything but these front walls |
 |
| Still an issue if I add a collision walls here |
The whole day wasn't a complete waste though, I now have the majority of a collision mesh for my building and fixed the texturing problem for the van & trees. I also imagined some other assets I'd like to create over the Easter break to make it more interesting but you'll have to wait and see what it is when I come back! Hopefully it'll turn out well, I have high hopes but may not get the time to do it all.
Wednesday - Game Art conference day
I wasn't too sure of what to expect from today, as I thought it would just be a couple of sessions advising us on how to go about what information to put in and how to lay it all out properly. However, it was far more helpful than initially thought because we actually did some activities to get us thinking about it in a new way.
The sessions I attended were:
-Word art: Using words creatively
-Shaping your writing
-The tools of visual practice
-Have a go!
To quickly summerise the sessions, I enjoyed all of them collectively, although, I definitely found 1 in particular much more helpful than the others.
'Word art' consisted of analysing an artist's image and trying to think more creatively about how we use words to describe artwork. I'll be honest, it was alright but it wasn't anything 'new' to me and didn't see how it will influence my future blogs.
'Shaping your writing' was initially random for me and I didn't see how it would help with my blogs, however, after the message "Convey a main point to the reader through your use of writing and images", I realised that it is important to focus on a couple of important things only and keep it easy-to-follow. Coming up with a short comic strip was rather interesting and it yielded a funny result but has good meaning behind it.
'Tools of visual practice' was the most helpful session by far as it demonstrated a new way that I hadn't considered before which helps drastically in imagining a scene and being able to describe it in-depth, without thinking too hard about it. I most definitely will use this technique and I think I get produce good things with it. Not to mention the mind-blowing concept art that Mitch created within 2 hours... Literally jaw dropping and I must know his method of digital painting!
Finally, 'have a go!' was just to finish up the day by looking at what still needs to be done before the submission date, but also to look into where my blogs are weak/lacking and hopefully improve them for future posts.
Personal Work
As I mentioned earlier, I wish to improve greatly in digital painting and in order to combat this, I have spent many hours looking into as many different methods that other people use to get a good result. My thinking behind this is: To observe how greatness is achieved, adopt a preferred technique, and practice endlessly. Chris recommended I looked at Feng Zhu's work as he also has many tutorials... I have to say that it blew my mind how fast these concept painting are made and to a very high standard. From watching some of his videos, I think I'd like to start small and to do this I'll just work in grey-scale and try and design things from silhouettes, then add details using the values. By doing this I don't have to worry about colour yet, but I can still get the hang of working in this manor, plus, if it turns out well I'll build confidence. So, I am setting this for me to do in my spare time and it will be (at this moment) the main task over the summer. By the end of the summer I want to be in a position where I am confident that I can produce some sort of 'decent' concept art if asked to.
In addition to this, I'd like to just have mini projects for myself in 3D. For example, go out and model my whole garden which will give me practice in foliage. Or, better yet, model something for someone else! My dad has requested that at some point I model one of his motorbikes; this will also give me more practice in vehicles and give me a texturing challenge with the metallic textures.
Anyway, I wish you all a lovely Easter and get a well deserved 1 week off! Blogs will continue when I go back to DMU. See you all soon :)
Sunday, 30 March 2014
DMUGA Week 26 - This one's a long one...
This week was a rather interesting one! We re-visited Bradgate Park, obtained feedback on our 3D work, did a very shaky (rather terrible) presentation and finally got round to doing some digital painting... Of which is of course very basic (I'm trying to learn!).
Monday - Visual Design
The whole point of today was to walk around and obtain textures (i.e. trees, rocks), pictures of the general landscape and draw whenever we took a break. In terms of the drawing aspect, one of the things I have struggled with from day 1 was drawing on the spot getting the perspective right, but throughout this term I have seen an improvement in this. Of course it's tricky from certain positions and I'll have to work on that, but for the first time I tried to just confidently mark the tree's form in a relaxed manor and it turned out quite accurate! I'm hoping this wasn't just luck and that it will continue, but this is the drawing I started when I was there:
For the texture aspect, I am disappointed to say I didn't get as many as I would have liked; this slipped my mind at times, but other times I was reluctant to take some because the lighting was so harsh it wasn't really worth it. In retrospect, I could have taken them anyway and used them as reference.
Using one of the pictures taken, I thought I'd at least try my luck at doing something digital, it's the only way I'll ever improve so why not? In my opinion, it turned out alright and I tried not to spend that long on it (1hr 30mins) because I have seen what level you should be getting to within this time. Obviously, it's not exactly a masterpiece but it's a start. There is a stage at which I get stuck at currently in all of the limited amount of painting I've done and that is detail. I'm not that bad at blocking in where things need to go and getting the composition ok, but for the life of me I cannot seem to add worthwhile details. I guess it's making me annoyed at myself which leads me to watch videos on how other people do it and then attempting it again.
The day itself was really enjoyable and I had a great time. Chris shared his current daily routines and it motivated me to try and do even more than I am right now. If someone else who works as hard as he does looked at the amount of time I technically have to do 'whatever', they'd probably say I could schedule in a lot more practice time. My quality of sleep has always been bad and it takes me a very long time to even drift off, so I was forced to change my 6hrs window for sleep to 8hrs as I was making myself ill by staying up until 2 and getting up for uni at 8.
My current routine every single day that I don't have timetabled lessons:
-Get up 9-10am-eat 1st meal, catch up on daily stuff, eat 2nd meal at 10:30-11am, go to gym until 12-12:30pm, eat 3rd meal from 1-2pm, (WHEN I SHOULD START WORK+Buy any food I need), start work around 3-4pm and carry on until 10:30-11:30pm with a lot of food breaks, try to sleep around 12:30-1am. With this I manage about 6 hours per day of actual work.
Having written this out, my problems are:
-Having too long breaks
-Not starting when I need to
-Gym in morning?
This is turning into a rant now, but I'll write about my ideas on what I can change at some point as I have an idea on what I could try. One of them is to just get on with it!
On a side note: I thoroughly enjoyed chatting to Chris about progress in weight training and dietary aspects, again, motivating me not just in work ethic but training too - Thank-you :)
Tuesday - Game Production Assessments - Addressing feedback
I know where things should have been better and I'm always open to any advice to better myself and/or my work. I am also 100% for the internal locus of control, but for some of the problems that arose, I really couldn't have done anything about it, or acted based on what I've been taught in class.
Generally, I thought it wouldn't be too bad. Nope. A whole host of things were problematic.
The main points were:
Character/Gladiator=
-Body texture looked "chaotic" and "patchy".
In the design document I wrote how 3DS Max wasn't liking the viewport canvas and so I had not choice but to submit it with all of the horrid seams. If I knew another way to get rid of them then I would have! Teach me please!!! I spent so long trying to get it to work, it left no time to make the diffuse better, but I'll try to correct the 'patchy-ness' next time.
-My scheduling was off.
I don't know what the optimal timing is for the stages in character creation, plus, I'd never rigged before and our tutor told us we must leave a lot of time for rigging. I gave it some leeway and my timings were generally pretty good. :)
-Naming needs to be more accurate + need to hide or delete unwanted items.
The only thing I can possibly think of for 'unwanted items' is the 3 lights, so that's a fair comment. Also, I name everything, so it can't be that and all my textures for this project were named fine in my opinion e.g. "Armour_Diffuse_001".
-Rigging needs immediate attention.
Honestly, the majority of it is ok, the real 'bad' part was the shoulders that are in need of major attention. The bottom leather parts had to be connected to his legs otherwise it would look odd with his hamstrings just clipping through everything.
-Over budget.
I know for a fact that in terms of the person, I was definitely under 2500 tris. The 300 tri budget for props was obviously over. I only did that because our tutor said it was ok - Why would I not want to create more assets if you have the 'go ahead', that's practice?
Transit Van=
The feedback for the van was a lot more reasonable and I know where the errors were.
-Should have used a composite material for the logo on the side of the van.
I know now, at the time it was too late to change it so quickly tried to hide the problem using the UV's.
-No specular map for outside + don't rely on crazy bump to create it.
There is a specular map, labelled "Van_Exterior_Texture_spec_001" and I make all of them using Photoshop from the diffuse as a base. In this case, the specular wasn't very good so I need to fix that.
As you can tell it wasn't the best day for me.
I later spent around 4 hours making the presentation all over again for tomorrow, and another 2 hours to script/practice.
Wednesday - Critical Studies
Wow, so after the big rush to re-do my whole presentation (first one had no theme to it) and practice it... I choked. I felt okay about the presentations and I was moderately prepared, but as soon as I started talking... Nope. I don't want to re-live it in my head again and describe the details. It's not like I've never done an important presentation before, although, I definitely haven't done a 'pecha kucha' styled one before. The 18 seconds for every slide may have been the reason why. 18 seconds was fine for what I needed to say but between the *thinking what I have to say* and saying it; caused me to go over to the next slide and speak even faster and just making it worse for myself.
That was the experience very briefly as I'm already feeling embarrassed again.
The rest of today was dedicated to doing some drawings of Bradgate and I finally got round to carrying on with the exporting of my assets into UDK with collision meshes.
Another Bradgate drawing:

UDK Exporting
Having successfully exported the bin project into UDK already, I assumed all the others would be pretty much the same process; they were generally (In the end). Although, after I'd created all of the meshes and begun exporting them, I hit a problem. My collision meshes weren't working. In my major panic to get something submitted on Friday, I just used ASE files instead of FBX and that fixed the problem. It wasn't until Thursday night that I figured out that the collision mesh in FBX format has to be named exactly (case sensative) the same as the mesh it resembles. *Facepalm*. I then went through, renamed and re-exported them. As usual, there's always one that doesn't want to work:
I have tried 'meshing around' (haha, get it?) with the collision mesh for a while and it still has this problem.
The other problem is the textures:
In summary, it has been a long and weird week but definitely a useful one.
Monday - Visual Design
The whole point of today was to walk around and obtain textures (i.e. trees, rocks), pictures of the general landscape and draw whenever we took a break. In terms of the drawing aspect, one of the things I have struggled with from day 1 was drawing on the spot getting the perspective right, but throughout this term I have seen an improvement in this. Of course it's tricky from certain positions and I'll have to work on that, but for the first time I tried to just confidently mark the tree's form in a relaxed manor and it turned out quite accurate! I'm hoping this wasn't just luck and that it will continue, but this is the drawing I started when I was there:
 |
| Started the tree when I was there - Approx 30-35mins |
 |
| Afterwards - focused on a different rendering technique - Approx 2hrs |
For the texture aspect, I am disappointed to say I didn't get as many as I would have liked; this slipped my mind at times, but other times I was reluctant to take some because the lighting was so harsh it wasn't really worth it. In retrospect, I could have taken them anyway and used them as reference.
Using one of the pictures taken, I thought I'd at least try my luck at doing something digital, it's the only way I'll ever improve so why not? In my opinion, it turned out alright and I tried not to spend that long on it (1hr 30mins) because I have seen what level you should be getting to within this time. Obviously, it's not exactly a masterpiece but it's a start. There is a stage at which I get stuck at currently in all of the limited amount of painting I've done and that is detail. I'm not that bad at blocking in where things need to go and getting the composition ok, but for the life of me I cannot seem to add worthwhile details. I guess it's making me annoyed at myself which leads me to watch videos on how other people do it and then attempting it again.
 |
| Bradgate Park digital painting |
 |
| Space centre digital painting (Background obviously made up) |
My current routine every single day that I don't have timetabled lessons:
-Get up 9-10am-eat 1st meal, catch up on daily stuff, eat 2nd meal at 10:30-11am, go to gym until 12-12:30pm, eat 3rd meal from 1-2pm, (WHEN I SHOULD START WORK+Buy any food I need), start work around 3-4pm and carry on until 10:30-11:30pm with a lot of food breaks, try to sleep around 12:30-1am. With this I manage about 6 hours per day of actual work.
Having written this out, my problems are:
-Having too long breaks
-Not starting when I need to
-Gym in morning?
This is turning into a rant now, but I'll write about my ideas on what I can change at some point as I have an idea on what I could try. One of them is to just get on with it!
On a side note: I thoroughly enjoyed chatting to Chris about progress in weight training and dietary aspects, again, motivating me not just in work ethic but training too - Thank-you :)
Tuesday - Game Production Assessments - Addressing feedback
I know where things should have been better and I'm always open to any advice to better myself and/or my work. I am also 100% for the internal locus of control, but for some of the problems that arose, I really couldn't have done anything about it, or acted based on what I've been taught in class.
Generally, I thought it wouldn't be too bad. Nope. A whole host of things were problematic.
The main points were:
Character/Gladiator=
-Body texture looked "chaotic" and "patchy".
In the design document I wrote how 3DS Max wasn't liking the viewport canvas and so I had not choice but to submit it with all of the horrid seams. If I knew another way to get rid of them then I would have! Teach me please!!! I spent so long trying to get it to work, it left no time to make the diffuse better, but I'll try to correct the 'patchy-ness' next time.
-My scheduling was off.
I don't know what the optimal timing is for the stages in character creation, plus, I'd never rigged before and our tutor told us we must leave a lot of time for rigging. I gave it some leeway and my timings were generally pretty good. :)
-Naming needs to be more accurate + need to hide or delete unwanted items.
The only thing I can possibly think of for 'unwanted items' is the 3 lights, so that's a fair comment. Also, I name everything, so it can't be that and all my textures for this project were named fine in my opinion e.g. "Armour_Diffuse_001".
-Rigging needs immediate attention.
Honestly, the majority of it is ok, the real 'bad' part was the shoulders that are in need of major attention. The bottom leather parts had to be connected to his legs otherwise it would look odd with his hamstrings just clipping through everything.
-Over budget.
I know for a fact that in terms of the person, I was definitely under 2500 tris. The 300 tri budget for props was obviously over. I only did that because our tutor said it was ok - Why would I not want to create more assets if you have the 'go ahead', that's practice?
Transit Van=
The feedback for the van was a lot more reasonable and I know where the errors were.
-Should have used a composite material for the logo on the side of the van.
I know now, at the time it was too late to change it so quickly tried to hide the problem using the UV's.
-No specular map for outside + don't rely on crazy bump to create it.
There is a specular map, labelled "Van_Exterior_Texture_spec_001" and I make all of them using Photoshop from the diffuse as a base. In this case, the specular wasn't very good so I need to fix that.
As you can tell it wasn't the best day for me.
I later spent around 4 hours making the presentation all over again for tomorrow, and another 2 hours to script/practice.
Wednesday - Critical Studies
Wow, so after the big rush to re-do my whole presentation (first one had no theme to it) and practice it... I choked. I felt okay about the presentations and I was moderately prepared, but as soon as I started talking... Nope. I don't want to re-live it in my head again and describe the details. It's not like I've never done an important presentation before, although, I definitely haven't done a 'pecha kucha' styled one before. The 18 seconds for every slide may have been the reason why. 18 seconds was fine for what I needed to say but between the *thinking what I have to say* and saying it; caused me to go over to the next slide and speak even faster and just making it worse for myself.
That was the experience very briefly as I'm already feeling embarrassed again.
The rest of today was dedicated to doing some drawings of Bradgate and I finally got round to carrying on with the exporting of my assets into UDK with collision meshes.
Another Bradgate drawing:
UDK Exporting
Having successfully exported the bin project into UDK already, I assumed all the others would be pretty much the same process; they were generally (In the end). Although, after I'd created all of the meshes and begun exporting them, I hit a problem. My collision meshes weren't working. In my major panic to get something submitted on Friday, I just used ASE files instead of FBX and that fixed the problem. It wasn't until Thursday night that I figured out that the collision mesh in FBX format has to be named exactly (case sensative) the same as the mesh it resembles. *Facepalm*. I then went through, renamed and re-exported them. As usual, there's always one that doesn't want to work:
 |
| How do I solve this? |
I have tried 'meshing around' (haha, get it?) with the collision mesh for a while and it still has this problem.
The other problem is the textures:
 |
| Material translucency - What is causing this? (I now know what was going on!) |
Sunday, 23 March 2014
DMUGA Week 25 - New software to learn & presentations... Scary!
Hey guys, this week has been pretty interesting! We've handed in our final 3d model for this term, repeated a project from the start of the year, introduced to the Unreal Development Kit (UDK), and had a 2 hour long critical studies seminar in which we were told about a presentation we will have to do next week (Oh my).
Monday - Visual Design
Well, repeated the project 'kind of'. As mentioned in the previous blog, we went to re-visit the National Space Centre, however, as it was Monday... It was closed. I expected to only draw the outside anyway, so this didn't really affect my intentions of what I wanted to do. I think it is good that we get to do this again because even though I was satisfied with the pencil & fine liner drawings the first time, I want to see if I have developed and in what ways.
Straight away I noticed that I was getting the perspective faster and more accurate than I did a while back. Even as I was drawing I realised that I was taking into account the relative sizes of the objects from my perspective a lot more. I still got this a bit off at times, but I saw the mistake and knew what was wrong with it. In addition to these, the process of which I went about drawing was different too. Originally, I began and finished basically the whole picture with the same pencil and for the majority of the time, working with a fairly blunt end. This time, I began with a sharp B, and worked into the shadows with a 3-5B, then for really dark areas I used the 7B. Thing is, I was doing this without really thinking about it so I have now adopted this as the norm.
I still think that I need to sharpen my pencils even more than I currently do and I need to work on relative sizes, but I can definitely see an improvement - They are more refined.
Here's a couple of pictures:


Tuesday - Game Production
Oh, how it was a relief to finally hand in that gladiator! It was the longest project we have been given so far and despite feeling fairly good about the outcome, there were so many things that were bugging me about it (as explained in the previous blog). I just couldn't get rid of those seams due to constant crashing on 3DS Max's behalf. Like all of my projects so far, it was a good learning experience and I am glad that I have changed my mindset o going about the modelling process.
I haven't actually got the images on me to post the final renders, but this is generally it:


After the last hour of bringing all of the necessary files on disk, it was a good feeling to hand it in... Aaaand move instantly on to the next learning curve in 3D: A game engine! I have been so excited to see what my models would actually look like 'in-game' and now we are able to import them into UDK and see how they fair with the luscious lighting. I did say the gladiator was our 'final' model, and it is, but this week we were told to import all of our models into one scene file for UDK. I'll have to find out exactly what we have to do as I left to get a backup file for the gladiator and missed the brief, but as of now, I am making the collision meshes for all my models and ensuring they are all ready for exporting.
This for me is really exciting and I can't wait to see what they all look like! Learning how to use 3DS Max at the beginning of this course was slow for the first few weeks and I have gradually gotten faster, but my goal here is to learn the basics as soon as I can and repeat them constantly so the muscle memory is there. This time I want to approach it a bit differently - Imagine that I already know kind of what to do and don't be scared of pressing all these new buttons. There is a lot to learn, but it will be fun and hopefully I will know my way around the processes in no time!
My first textured project... The famous wheelie bin <500 tris, only a diffuse map:

Wednesday - Critical Studies
Today was an unusual extra-long seminar instead of the usual 1 hour split between lecture & seminar, so I imagined it would be something really big or related to the group project. However, it was actually about 'Art Direction' and I found it particularly fascinating! We were shown images of a recently released game (Can't remember the name but that's beside the point), and within those images were some paint-overs. Starting with the blocked-out layout of a forest scene, and seeing how it changed to make it more aesthetically pleasing and 'grounded' with the original conceptual art was rather cool.
The lesson then proceeded with the images we were asked to bring in and many people got to describe the reasons why they were drawn to them and analysed why they worked well. These included varied drawings of batman across the ages, to artwork from Metal Gear Solid. Something I thought which was literally jaw dropping was the video of visual effects for the film 'Life of Pi'. I have seen these type of VFX breakdowns for other movies and every single time I see one of these I can't help but chuckle in amazement! Almost everything you see is not originally there/modelled/composited and it is mind-blowing how well people can put together these sequences and make them convincing to the viewer.
Our homework for this week is to pick an image and analyse it, so I have decided to pick the one I have on a small A5 canvas in my room:
I saw this canvas in a small shop at Leicester city centre and thought it was a lovely. It is clearly 'Gothic' styled and for whatever reason (I do not know to this day, why), I've always loved the artwork in the Gothic genre.
As a piece, your attention is drawn to her face and then down towards the dragon. This is because the colours of almost everything in the picture are dark blues & greens, creating a cool atmosphere and drawing less attention in contrast to the warm skin tone of the female. Personally, my gaze primarily goes from her arm, towards the face, down to the dragon, followed by the blue archway and finally the bright water below.
In terms of the composition, the 2 bodies are equally spaced from the sides and the height parameters of both are offset towards the bottom of the picture. This frames the image very nicely and obeys the rule of thirds to a good extent - Not only in the positioning of the bodies, but also in the horizon line. In addition, the archway in the background already sort of frames them, and makes you focus even more on their faces because the darkness within makes them stand out.
There is also emotion in this image, portrayed through the facial expression and the way in which she is holding the dragon. By holding the dragon in this way (almost like an infant), it expresses some sort of bond between them which is further backed up with the female's facial expression; to me it shows love & care.
Furthermore, the saturation of the colours is quite high, making for a vibrant image. I think that if it used less saturated colours, it would take out some of the emotion.
Overall, I personally love this image for the reasons described and the Gothic theme is just my personal taste.
Personal
I think I have said this before but recently, I have been looking into speed painting and it keeps making me want to produce some of my own, but haven't really done much. However, I hope this will change soon as I remembered a suggestion for someone to look at which is 'Feng Zhu'. His work & tutorials are so amazing that I think it has kicked me into actually doing some. So, my goal on how to spend some of my free time is just to literally practice and play about with things; I most likely won't post things I am not proud of though.
Monday - Visual Design
Well, repeated the project 'kind of'. As mentioned in the previous blog, we went to re-visit the National Space Centre, however, as it was Monday... It was closed. I expected to only draw the outside anyway, so this didn't really affect my intentions of what I wanted to do. I think it is good that we get to do this again because even though I was satisfied with the pencil & fine liner drawings the first time, I want to see if I have developed and in what ways.
Straight away I noticed that I was getting the perspective faster and more accurate than I did a while back. Even as I was drawing I realised that I was taking into account the relative sizes of the objects from my perspective a lot more. I still got this a bit off at times, but I saw the mistake and knew what was wrong with it. In addition to these, the process of which I went about drawing was different too. Originally, I began and finished basically the whole picture with the same pencil and for the majority of the time, working with a fairly blunt end. This time, I began with a sharp B, and worked into the shadows with a 3-5B, then for really dark areas I used the 7B. Thing is, I was doing this without really thinking about it so I have now adopted this as the norm.
I still think that I need to sharpen my pencils even more than I currently do and I need to work on relative sizes, but I can definitely see an improvement - They are more refined.
Here's a couple of pictures:
Tuesday - Game Production
Oh, how it was a relief to finally hand in that gladiator! It was the longest project we have been given so far and despite feeling fairly good about the outcome, there were so many things that were bugging me about it (as explained in the previous blog). I just couldn't get rid of those seams due to constant crashing on 3DS Max's behalf. Like all of my projects so far, it was a good learning experience and I am glad that I have changed my mindset o going about the modelling process.
I haven't actually got the images on me to post the final renders, but this is generally it:
After the last hour of bringing all of the necessary files on disk, it was a good feeling to hand it in... Aaaand move instantly on to the next learning curve in 3D: A game engine! I have been so excited to see what my models would actually look like 'in-game' and now we are able to import them into UDK and see how they fair with the luscious lighting. I did say the gladiator was our 'final' model, and it is, but this week we were told to import all of our models into one scene file for UDK. I'll have to find out exactly what we have to do as I left to get a backup file for the gladiator and missed the brief, but as of now, I am making the collision meshes for all my models and ensuring they are all ready for exporting.
This for me is really exciting and I can't wait to see what they all look like! Learning how to use 3DS Max at the beginning of this course was slow for the first few weeks and I have gradually gotten faster, but my goal here is to learn the basics as soon as I can and repeat them constantly so the muscle memory is there. This time I want to approach it a bit differently - Imagine that I already know kind of what to do and don't be scared of pressing all these new buttons. There is a lot to learn, but it will be fun and hopefully I will know my way around the processes in no time!
My first textured project... The famous wheelie bin <500 tris, only a diffuse map:
Wednesday - Critical Studies
Today was an unusual extra-long seminar instead of the usual 1 hour split between lecture & seminar, so I imagined it would be something really big or related to the group project. However, it was actually about 'Art Direction' and I found it particularly fascinating! We were shown images of a recently released game (Can't remember the name but that's beside the point), and within those images were some paint-overs. Starting with the blocked-out layout of a forest scene, and seeing how it changed to make it more aesthetically pleasing and 'grounded' with the original conceptual art was rather cool.
The lesson then proceeded with the images we were asked to bring in and many people got to describe the reasons why they were drawn to them and analysed why they worked well. These included varied drawings of batman across the ages, to artwork from Metal Gear Solid. Something I thought which was literally jaw dropping was the video of visual effects for the film 'Life of Pi'. I have seen these type of VFX breakdowns for other movies and every single time I see one of these I can't help but chuckle in amazement! Almost everything you see is not originally there/modelled/composited and it is mind-blowing how well people can put together these sequences and make them convincing to the viewer.
Our homework for this week is to pick an image and analyse it, so I have decided to pick the one I have on a small A5 canvas in my room:
 |
| By Anne Stokes - Water Dragon |
 |
| 'Rule of Thirds' |
In terms of the composition, the 2 bodies are equally spaced from the sides and the height parameters of both are offset towards the bottom of the picture. This frames the image very nicely and obeys the rule of thirds to a good extent - Not only in the positioning of the bodies, but also in the horizon line. In addition, the archway in the background already sort of frames them, and makes you focus even more on their faces because the darkness within makes them stand out.
There is also emotion in this image, portrayed through the facial expression and the way in which she is holding the dragon. By holding the dragon in this way (almost like an infant), it expresses some sort of bond between them which is further backed up with the female's facial expression; to me it shows love & care.
Furthermore, the saturation of the colours is quite high, making for a vibrant image. I think that if it used less saturated colours, it would take out some of the emotion.
Overall, I personally love this image for the reasons described and the Gothic theme is just my personal taste.
Personal
I think I have said this before but recently, I have been looking into speed painting and it keeps making me want to produce some of my own, but haven't really done much. However, I hope this will change soon as I remembered a suggestion for someone to look at which is 'Feng Zhu'. His work & tutorials are so amazing that I think it has kicked me into actually doing some. So, my goal on how to spend some of my free time is just to literally practice and play about with things; I most likely won't post things I am not proud of though.
Sunday, 16 March 2014
DMUGA Week 24 - Rigging is a tedious task!
Hey everyone! This week we modelled our reef character, discussed blog writing and moved on to finalizing our Roman gladiator!
Read on for the details:
Monday - Visual Design
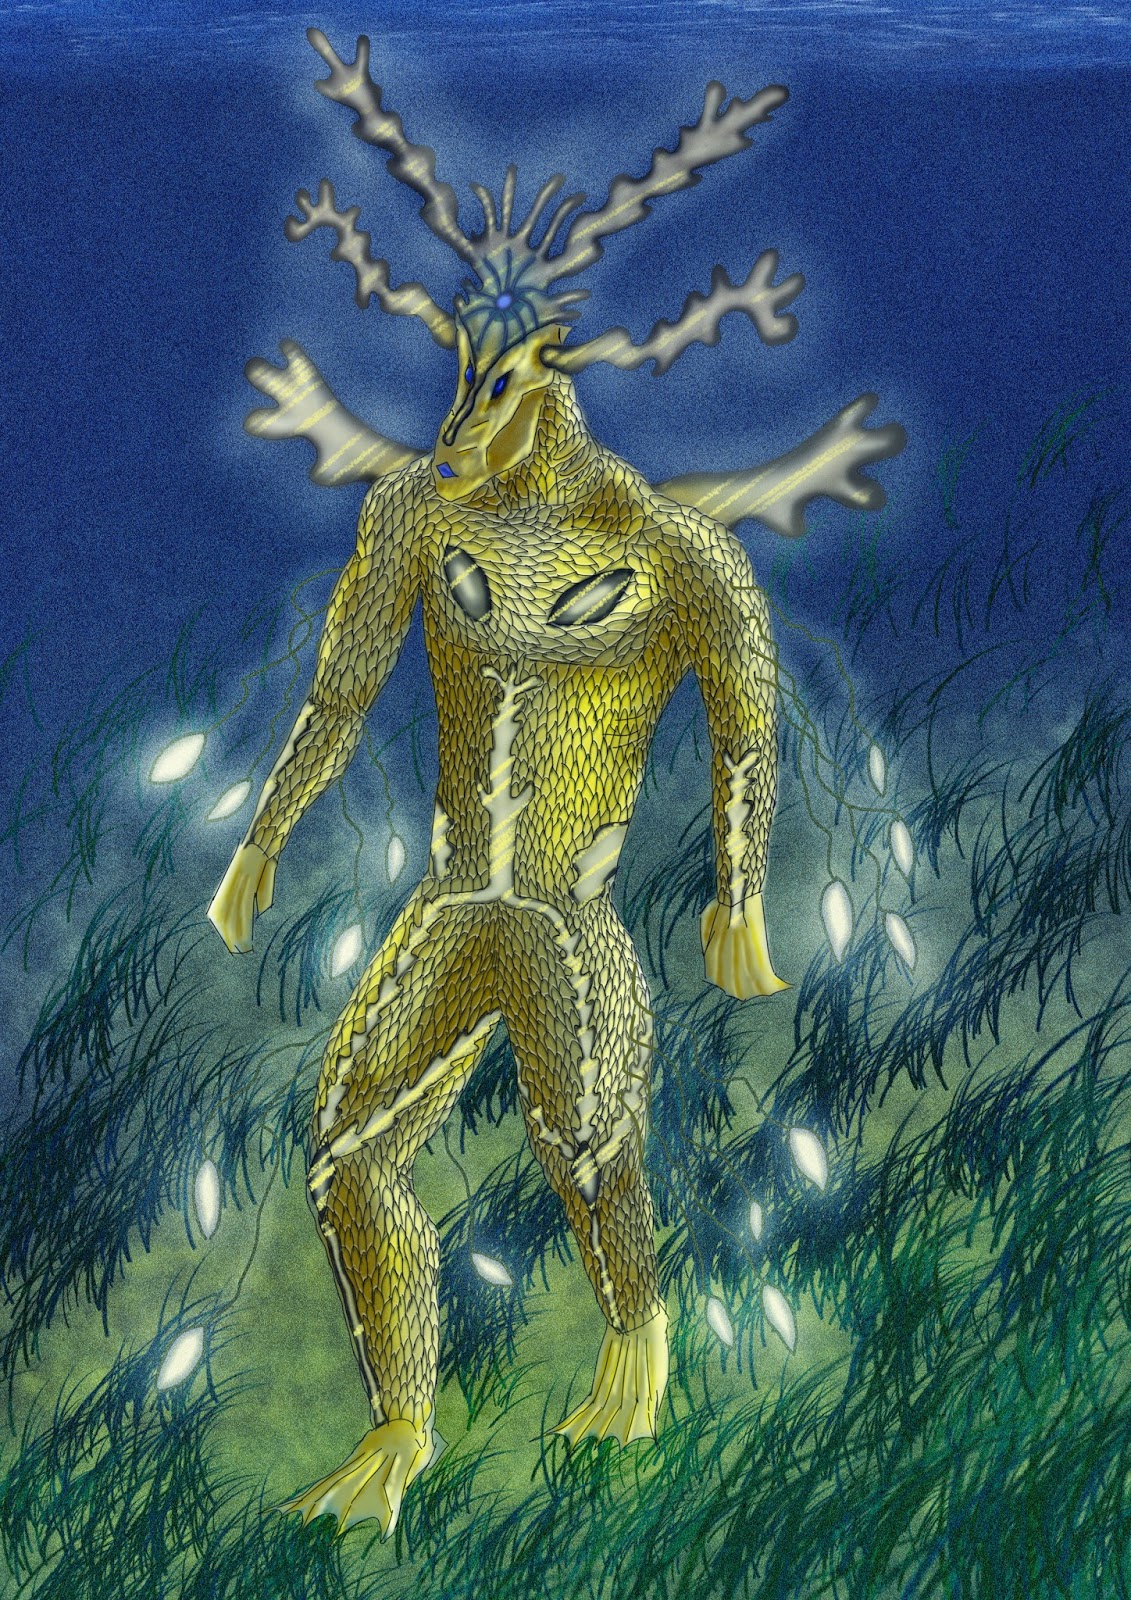
The project this week is what I assumed which was to model our reef character using any selected materials. Initially, I thought that it wouldn't turn out that great, purely because my last one wasn't exactly a masterpiece. However, having said that, you should get better the more you do something. I was determined this time to make a great looking Plasticine model of my reef character. In order to achieve this, I started looking at how others sculpt the male torso and arms, as well as revisiting the anatomy. This allowed me to really exaggerate some of the muscles like I had initially sketched into the design. I hope that if I keep revisiting the anatomy, I'll be able to pick certain features I was to stand out and overall improve my 2D drawing skills too.
Small bit of extra development:


Plasticine model:
I chose Plasticine mainly because I am new to making physical models and it's easy to work with. The downside is that it doesn't dry and on my previous model, parts have fallen off, plus, I had to prop him up using another object. This is also the reason why I didn't model the legs in this case; the top half does this character justice and is the focal point, therefore it only made sense to make a more detailed top half instead.
I had a lot of fun modelling this guy, I feel like I have made progress and this time, proud of what I made.
Alongside this I also did a little bit of development on the hands of my reef character, and another digital painting because I really need to practice. The second one has more atmosphere than my first, but the first is definitely more detailed and had quite a lot of time put into it. Also, on the 2nd version, I used the technique of blocking it out and then going in afterwards:
Tuesday - Game Production
The focus this week though was finishing my gladiator.
I think that rigging is just another one of those things that initially takes quite a long time and is a bit messy, but over time, I'll improve upon by having a faster workflow and doing a much cleaner job. Take texturing for example: At the beginning of this course I was struggling to get the Darlek modelled for the following week and as soon as textures were thrown at us for the wheelie bin, I panicked. Texturing at the start seemed like something that would take forever, and my workflow in Photoshop wasn't exactly great & it was all a bit 'wishy washy' (Layers, all non-destructive etc) but if I were given the bin project again now, I'd have it modelled and textured within the day! Thinking about that improvement now is quite something.
Don't get me wrong though, I love rigging because you can see your model come to life. However, I'd say the most stressful things at the moment are the following:
-Switching in and out of figure mode to test the model without breaking it.
-Selecting verts underneath the clothing... Seriously, the 'loop' selection tool doesn't even work!
-Intersections of polys on the shoulder - Rigging shoulders is quite a challenge.
-Just changing anything in the model seems to break the whole rig... Really need a solution for this.
-Painting out seams in 3DS Max... Why must you crash on me every time? I can't get rid of the hideous seams all over the gladiator because of this!
After all the trouble 3DS Max gave me for the rigging, I am really pleased with the overall product. Of course there are things that could be a lot better and I've identified them in the design document. In terms of what I have learnt from doing this project, I have developed my mentality & workflow further, as well as the actual learning of the basic rigging & character modelling process.
Wednesday - Critical Studies
I'll be perfectly honest, I can't remember much from the lecture as I am writing this 4 days after - I usually make notes but they turned the lights off and I couldn't see where to write. Anyway, I do remember that by a certain date, all of our blogs will be reviewed and we will have workshops in the library to help us with them. I think this is a great idea because all of my blogs at the moment just update anyone reading them on what work I'm doing. It'll be good to get some ideas for things I can write about to make these more interesting!
Personal Work
As mentioned before, I really need to improve my digital painting skills. So, the first step towards this is by observing the process of how others work. I have been watching many videos to see how other artists go about their digital work. I find it fascinating to watch and it gets me excited to do my own, so whenever I feel ready to just pick an idea and go for it, I will and in doing so, I'll get practice. At the moment, I can get the basic blocks for things, but I struggle to imagine up all of the little details that really make the piece look far more believable.
I am still continuing with Photoshop tutorials and am loving exploring what you can do. I have a particular interest in photography & retouching tutorials, but all techniques are useful and can be directly applied for textures.
A good week overall, I'm still making progress and can't wait for visual design tomorrow as we're revisiting the National Space Centre! :)
Read on for the details:
Monday - Visual Design
The project this week is what I assumed which was to model our reef character using any selected materials. Initially, I thought that it wouldn't turn out that great, purely because my last one wasn't exactly a masterpiece. However, having said that, you should get better the more you do something. I was determined this time to make a great looking Plasticine model of my reef character. In order to achieve this, I started looking at how others sculpt the male torso and arms, as well as revisiting the anatomy. This allowed me to really exaggerate some of the muscles like I had initially sketched into the design. I hope that if I keep revisiting the anatomy, I'll be able to pick certain features I was to stand out and overall improve my 2D drawing skills too.
Small bit of extra development:
Plasticine model:
 |
| Front View |
 |
| Side View |
 |
| 3/4 Back View |
 |
| Close 3/4 Front View |
 |
| Close Back View |
I chose Plasticine mainly because I am new to making physical models and it's easy to work with. The downside is that it doesn't dry and on my previous model, parts have fallen off, plus, I had to prop him up using another object. This is also the reason why I didn't model the legs in this case; the top half does this character justice and is the focal point, therefore it only made sense to make a more detailed top half instead.
I had a lot of fun modelling this guy, I feel like I have made progress and this time, proud of what I made.
Alongside this I also did a little bit of development on the hands of my reef character, and another digital painting because I really need to practice. The second one has more atmosphere than my first, but the first is definitely more detailed and had quite a lot of time put into it. Also, on the 2nd version, I used the technique of blocking it out and then going in afterwards:
 |
| 1st version |
 |
| 2nd Version |
Tuesday - Game Production
The focus this week though was finishing my gladiator.
I think that rigging is just another one of those things that initially takes quite a long time and is a bit messy, but over time, I'll improve upon by having a faster workflow and doing a much cleaner job. Take texturing for example: At the beginning of this course I was struggling to get the Darlek modelled for the following week and as soon as textures were thrown at us for the wheelie bin, I panicked. Texturing at the start seemed like something that would take forever, and my workflow in Photoshop wasn't exactly great & it was all a bit 'wishy washy' (Layers, all non-destructive etc) but if I were given the bin project again now, I'd have it modelled and textured within the day! Thinking about that improvement now is quite something.
Don't get me wrong though, I love rigging because you can see your model come to life. However, I'd say the most stressful things at the moment are the following:
-Switching in and out of figure mode to test the model without breaking it.
-Selecting verts underneath the clothing... Seriously, the 'loop' selection tool doesn't even work!
-Intersections of polys on the shoulder - Rigging shoulders is quite a challenge.
-Just changing anything in the model seems to break the whole rig... Really need a solution for this.
-Painting out seams in 3DS Max... Why must you crash on me every time? I can't get rid of the hideous seams all over the gladiator because of this!
After all the trouble 3DS Max gave me for the rigging, I am really pleased with the overall product. Of course there are things that could be a lot better and I've identified them in the design document. In terms of what I have learnt from doing this project, I have developed my mentality & workflow further, as well as the actual learning of the basic rigging & character modelling process.
In terms of mentality, I now know that instead of thinking "Oh,
this doesn't work too well but it still works alright, I'll work around
it", isn't always the best thing to do. Of course in some cases, you HAVE
to work around a problem, but in others like my UVW unwrapping of the arms
& hands, I should have thought "This doesn't fit on top of each other,
just copy the geometry of one arm to the other so they are identical and will
fit." This would have given more space for the torso & face, therefore, a higher resolution texture for those parts.
This leads into the point of just doing something again. I have had to redo many things before, it is encouraged! If
I did do what I just mentioned, I'd have to rig it again, but that's just what I'd need to do
for a better looking product at the end. There are other instances I should
have done it more than once, not just for the final product, but for practicing
the process itself.
A couple of renders of my gladiator:
A couple of renders of my gladiator:
 |
| Pose #1 |
 |
| Pose #2 |
Wednesday - Critical Studies
I'll be perfectly honest, I can't remember much from the lecture as I am writing this 4 days after - I usually make notes but they turned the lights off and I couldn't see where to write. Anyway, I do remember that by a certain date, all of our blogs will be reviewed and we will have workshops in the library to help us with them. I think this is a great idea because all of my blogs at the moment just update anyone reading them on what work I'm doing. It'll be good to get some ideas for things I can write about to make these more interesting!
Personal Work
As mentioned before, I really need to improve my digital painting skills. So, the first step towards this is by observing the process of how others work. I have been watching many videos to see how other artists go about their digital work. I find it fascinating to watch and it gets me excited to do my own, so whenever I feel ready to just pick an idea and go for it, I will and in doing so, I'll get practice. At the moment, I can get the basic blocks for things, but I struggle to imagine up all of the little details that really make the piece look far more believable.
I am still continuing with Photoshop tutorials and am loving exploring what you can do. I have a particular interest in photography & retouching tutorials, but all techniques are useful and can be directly applied for textures.
A good week overall, I'm still making progress and can't wait for visual design tomorrow as we're revisiting the National Space Centre! :)
Sunday, 9 March 2014
DMUGA Week 23 - Reef Character!
Okay, so the past couple of weeks have been good and I wanted to continue this streak. I knew we had the reef project for visual design and was looking forward to it but still a bit nervous as to what I would come up with. I found the 'interesting character' a hard one specifically - getting to grips with what you need to go through until you end up with a 'final'. Having done two of these character projects I pretty much know what I need to work on to improve.
Monday - Visual Design
As already stated, this week's brief was to design a humanoid reef character. I was rather excited about this one because I find the species of fish & coral that you find in reefs quite interesting and think you could do a lot with it. We did something we don't normally do which was take an hour out of the morning session to literally just go and find some reference material. E.g. books, online, make mood boards. Many people opted for the mood boards & online images, and many also went to the library to find books - I was one of those. We came back and discussed some ideas in groups which was good since we got to bounce some ideas around in a quick time frame.
I made a couple of mood boards with the scanned images, plus some other ones using online reference. This gave me a good starting point for the project because from there I looked for a wide range of species in the habitat and picked out the ones which were most interesting. After some brainstorming, I came up with 6 different ideas and picked one to look into further which later became my final. Now, back to what I said I struggle with:
-Orthographic Views
-Drawing the subject from an interesting view point + in an environment
These things are what I think would make what I do so much better & faster. I spend a long time just trying to get it to look right from a certain view point, plus, I find it hard to physically draw the actual environment... Just another thing added to the list of 'practice over the summer'. Here's SOME parts of my process:


Tuesday - Game Production
Wow, am I glad that Steve went through the rigging process again. From the previous lesson I was uncertain on exactly how to do it, but I now know what to do. Most of today was literally fixing a few issues which had been lingering for around 10 days:
-Poly count on figure = too high by 150 tris, cut down to 50, then below budget
-Re-shaped the face a little bit - Proportions are better
-Modelled the hands around the sword & shield due to the 'bone budget' (Only 1 joint in the 3 fingers; hands are modelled already half closed)
-Re-made the dome on the front of the shield = was too high poly and it looked out of place
Other than these things, I also managed to get a bit of the rigging actually done that day, frustratingly trying to get the armour to move with the body in some sort of correct fashion - Still need to fix the shoulder and a bit on the thighs.
In addition to all of this, I got my sword and shield textured and for the first time ever, I painted them all myself using a tablet :) I am proud of what I have managed to produce up until this point, but I really need to texture the body ASAP!
Here's what he looks like so far:
NOTE: The tri count is far higher than 2500 because of the biped inside the model :)
Friday - Critical Studies
Friday was most certainly an interesting day indeed. The lecture was about working together in groups, what can cause disruptions, problems etc. Also, how to go about resolving these issues if one does occur. I love the idea of working the groups though (provided everyone pulls their weight), and think this is a great opportunity to get first hand experience of working in a group but on something for game production!
The seminar was what I considered to be like one of those 'team building' sessions. Although a bit abstract at first with the initial activity, it was rather fun and it did help to relax us all a bit and talk to each other in the following exercises as opposed to what may usually happen when you're in a group with people you don't really know... Silence. After these team-building activities, we were given a very condensed personality test which defined you as 1 of 5 categories: - Driver - Navigator - Co-ordinator - Observer - Mechanic. Obviously these can interlink and you'll have traits in multiple categories, but my strongest one was 'Navigator', which to be fair, is mostly true. I think this is my natural one, but as I am adaptable, if I need to change roles then I don't think that's too much of a problem.
Overall, an alright week. I wish that I could have done more on my gladiator as the deadline in coming up soon and I still need to fix a couple of issues, and texture the whole body!...
Monday - Visual Design
As already stated, this week's brief was to design a humanoid reef character. I was rather excited about this one because I find the species of fish & coral that you find in reefs quite interesting and think you could do a lot with it. We did something we don't normally do which was take an hour out of the morning session to literally just go and find some reference material. E.g. books, online, make mood boards. Many people opted for the mood boards & online images, and many also went to the library to find books - I was one of those. We came back and discussed some ideas in groups which was good since we got to bounce some ideas around in a quick time frame.
I made a couple of mood boards with the scanned images, plus some other ones using online reference. This gave me a good starting point for the project because from there I looked for a wide range of species in the habitat and picked out the ones which were most interesting. After some brainstorming, I came up with 6 different ideas and picked one to look into further which later became my final. Now, back to what I said I struggle with:
-Orthographic Views
-Drawing the subject from an interesting view point + in an environment
These things are what I think would make what I do so much better & faster. I spend a long time just trying to get it to look right from a certain view point, plus, I find it hard to physically draw the actual environment... Just another thing added to the list of 'practice over the summer'. Here's SOME parts of my process:
 |
| Species in reef habitat - Mindmap |
 |
| Orthographic View |
Tuesday - Game Production
Wow, am I glad that Steve went through the rigging process again. From the previous lesson I was uncertain on exactly how to do it, but I now know what to do. Most of today was literally fixing a few issues which had been lingering for around 10 days:
-Poly count on figure = too high by 150 tris, cut down to 50, then below budget
-Re-shaped the face a little bit - Proportions are better
-Modelled the hands around the sword & shield due to the 'bone budget' (Only 1 joint in the 3 fingers; hands are modelled already half closed)
-Re-made the dome on the front of the shield = was too high poly and it looked out of place
Other than these things, I also managed to get a bit of the rigging actually done that day, frustratingly trying to get the armour to move with the body in some sort of correct fashion - Still need to fix the shoulder and a bit on the thighs.
In addition to all of this, I got my sword and shield textured and for the first time ever, I painted them all myself using a tablet :) I am proud of what I have managed to produce up until this point, but I really need to texture the body ASAP!
Here's what he looks like so far:
 |
| Gladiator - Wireframe |
 |
| Gladiator - Perspective view |
Friday - Critical Studies
Friday was most certainly an interesting day indeed. The lecture was about working together in groups, what can cause disruptions, problems etc. Also, how to go about resolving these issues if one does occur. I love the idea of working the groups though (provided everyone pulls their weight), and think this is a great opportunity to get first hand experience of working in a group but on something for game production!
The seminar was what I considered to be like one of those 'team building' sessions. Although a bit abstract at first with the initial activity, it was rather fun and it did help to relax us all a bit and talk to each other in the following exercises as opposed to what may usually happen when you're in a group with people you don't really know... Silence. After these team-building activities, we were given a very condensed personality test which defined you as 1 of 5 categories: - Driver - Navigator - Co-ordinator - Observer - Mechanic. Obviously these can interlink and you'll have traits in multiple categories, but my strongest one was 'Navigator', which to be fair, is mostly true. I think this is my natural one, but as I am adaptable, if I need to change roles then I don't think that's too much of a problem.
Overall, an alright week. I wish that I could have done more on my gladiator as the deadline in coming up soon and I still need to fix a couple of issues, and texture the whole body!...
Sunday, 2 March 2014
DMUGA Week 22 - Self Portrait & Gladiator Troubles! :S
Hey guys! This week as you can tell was all about drawing a self portrait of myself, and continuing with the gladiator project. I'd also like to add that I've been playing about in Photoshop, creating some cool images for a friend using photographs taken at a shoot, and will hopefully get access to a lot more. I'll explain in detail in just a bit, so here's a breakdown of this week:
Monday - Visual Design
After having just modelled my character from the previous week, I was exited to see what everyone else had produced. Although, since mine was made form Plasticine, it was damaged rather badly through transport, so I guess it was a good thing that we didn't layout all of our models... Oh dear. Moving on though, we were given the self portrait project to do for this week. How I went about it was researched a little into the facial structure by looking at the underlying muscles, and having looked more at the skull in the previous project, there was a foundation that I could work from.
Taking the 30 photographs of my face from different angles and facial expressions was interesting I have to say. It really makes you aware of what you look like to other people when in motion. I started with some quick sketches of my face, studied individual features alone (e.g. Nose, Eyes, Mouth etc), then did a couple which brought all of it together and settles on a final which turned out not bad - There's still something off about it, maybe the head needs squashing down every so slightly?:


I would have liked to have done a digital painting too because I know it would be great practice to do so - I therefore might do one over Easter (if I get the time), just because it will be fun as well as beneficial to my learning.
Life drawing was also rather good, we did some more with water colours, focusing on contrast, form and negative space. I didn't feel very well at the start and had to leave for about 10 mins, but carried on after as normal. We painted everything but the model, leaving us with a white silhouette. To finish, we did the same with, but then painted the model after painting the background, so this was rather tricky because if you got the size of the model wrong, it was essentially forcing you to paint the wrong proportions, knowing you made a mistake but couldn't go back and change it.
Tuesday - Game Production
This week's lesson was quite interesting (as usual), since we were taught the basics of rigging our characters. I know mine is far away from rigging, but it was good too do some prep work before I get to that stage so that I don't panic. The process for this rig is very straight forward and just how I imagined it to be, although, I naively thought that you wouldn't have to go in and adjust the weight of every single vertex to go along with the movements (Maybe a button which did that for you?... No). This isn't a problem, it just means I'll be able to really get stuck in and deep with the tweaking until everything looks good - The downside if obviously more time will need to be invested than I previously estimated, putting me a little behind in terms of where I should be at by this stage.
Currently, my gladiator has got all of his armour (unwrapped), and I am in the process of unwrapping his body appropriately. I've come across a couple of problems in the modelling such as overlapping vertices, but have fixed them rather swiftly.
To be honest, I really would like to have my armour textured and his body completely unwrapped by now. I really don't know why I haven't done that yet, but hopefully I'll get it done soon so I can move on to texturing the body.
Friday - Critical Studies
Another late night beforehand made it difficult to get up for the 9am lecture, but I soldiered on in good 'tired student' spirits. The lecture presented by Emma was quick and information filled. She went through with us the stages of level design. I don't know what I thought the general stages were before attending this lecture, but it certainly wasn't as long as what it really is. I guess it broke everything down into the different elements in a level which is something probably overlooked by many people because most of the time it all just blends together so well that you don't notice how much thought has gone into making everything work together. All in all, I thoroughly enjoyed hearing about more or less how a level is designed. There maybe times when multiple iterations of the level need to be assessed and worked on much more before settling on a final, but the principle remains similar.
The seminar looked into applying for a job in industry, and I'm going to be completely honest here and say... It scared me a little. Don't get me wrong, the idea of actually getting a job is amazing, but the level of skill that is required even for a technically 'simple' job is still so high, that you really have to bring your 'A-Game' with your portfolio. There's so many other people potentially after the same job as you, and you need to be so much better than them to get hired. I think this will be my biggest challenge.
I know soft skills also play an important role in employability, but if I am in a group and we need to get a task done, I know that I'll be easy to work with - I guess that's my big positive!
Analysis of another job:
I picked a very straight forward job to analyse, especially this one because it is probably the most relevant to me personally. Here, they are looking for a graduate, so this is something that I could be looking at after my time here at DMU. To be honest, this sounds like an amazing job for me: "Creating in-game assets", could be anything, I'm not fussed as long as I get to make good-looking assets and do a great job on them. Working with a director means experience with someone WITH experience, texturing skills will be developed, and overall just a really good opportunity to get experience as well as things for my portfolio.
They want:
-Someone who works & communicates well in a team = Tick
-Creative person with a passion for games = Tick
-Strong skills in both 2D & 3D = Working towards
-Good portfolio = Working Towards
-Willingness to learn = Ticked a thousand times
-Excellent knowledge in 3ds max & photoshop = Working towards
Everything about this job appeals to me, the only thing that would stop me right now is the fact that I'm not yet at the standard required, hence why I'm on this course trying to get better. I think everyone doing this type of course is aiming for near enough the same goal: To get better than the majority of people in 3D work & 2D work to create amazing new things for games. In order to do that I MUST, continue practicing everything we cover on the course, and widen my knowledge of just about everything there is in terms of software packages, design processes, art techniques etc.
Personal interests this week
For quite some time now, I have been watching online tutorials for Photoshop retouching. I think I have mentioned this in a very early blog, but I've continued with it and it's become a bit part of what I like to do in my spare time now. I am bursting to try out so many things I've learnt on actual images (Not ones from the internet), and a friend of mine allowed me to use some of her modelling photos to 'play about with' and just try different things. I originally started with the intention that it will help with my texturing/photo-manipulation, but carried on because even if it isn't being used for my uni work, I have developed a large interest in this area. I'd like to further my understanding in Photography, lighting, what works aesthetically etc, and hopefully buy a decent camera of my own... The only problem as always in money. So, I don't know when in the future, but my aim is to get a decent camera and take my own pictures from life and edit those using the Photoshop techniques I've learnt and hopefully create some cool images!
Monday - Visual Design
After having just modelled my character from the previous week, I was exited to see what everyone else had produced. Although, since mine was made form Plasticine, it was damaged rather badly through transport, so I guess it was a good thing that we didn't layout all of our models... Oh dear. Moving on though, we were given the self portrait project to do for this week. How I went about it was researched a little into the facial structure by looking at the underlying muscles, and having looked more at the skull in the previous project, there was a foundation that I could work from.
Taking the 30 photographs of my face from different angles and facial expressions was interesting I have to say. It really makes you aware of what you look like to other people when in motion. I started with some quick sketches of my face, studied individual features alone (e.g. Nose, Eyes, Mouth etc), then did a couple which brought all of it together and settles on a final which turned out not bad - There's still something off about it, maybe the head needs squashing down every so slightly?:
 |
| Self Portrait - It's a bit off: Lips slightly off, and nose is misshapen! |
I would have liked to have done a digital painting too because I know it would be great practice to do so - I therefore might do one over Easter (if I get the time), just because it will be fun as well as beneficial to my learning.
Life drawing was also rather good, we did some more with water colours, focusing on contrast, form and negative space. I didn't feel very well at the start and had to leave for about 10 mins, but carried on after as normal. We painted everything but the model, leaving us with a white silhouette. To finish, we did the same with, but then painted the model after painting the background, so this was rather tricky because if you got the size of the model wrong, it was essentially forcing you to paint the wrong proportions, knowing you made a mistake but couldn't go back and change it.
Tuesday - Game Production
This week's lesson was quite interesting (as usual), since we were taught the basics of rigging our characters. I know mine is far away from rigging, but it was good too do some prep work before I get to that stage so that I don't panic. The process for this rig is very straight forward and just how I imagined it to be, although, I naively thought that you wouldn't have to go in and adjust the weight of every single vertex to go along with the movements (Maybe a button which did that for you?... No). This isn't a problem, it just means I'll be able to really get stuck in and deep with the tweaking until everything looks good - The downside if obviously more time will need to be invested than I previously estimated, putting me a little behind in terms of where I should be at by this stage.
Currently, my gladiator has got all of his armour (unwrapped), and I am in the process of unwrapping his body appropriately. I've come across a couple of problems in the modelling such as overlapping vertices, but have fixed them rather swiftly.
 |
| Gladiator so far |
 |
| Currently unwrapping the head |
To be honest, I really would like to have my armour textured and his body completely unwrapped by now. I really don't know why I haven't done that yet, but hopefully I'll get it done soon so I can move on to texturing the body.
Friday - Critical Studies
Another late night beforehand made it difficult to get up for the 9am lecture, but I soldiered on in good 'tired student' spirits. The lecture presented by Emma was quick and information filled. She went through with us the stages of level design. I don't know what I thought the general stages were before attending this lecture, but it certainly wasn't as long as what it really is. I guess it broke everything down into the different elements in a level which is something probably overlooked by many people because most of the time it all just blends together so well that you don't notice how much thought has gone into making everything work together. All in all, I thoroughly enjoyed hearing about more or less how a level is designed. There maybe times when multiple iterations of the level need to be assessed and worked on much more before settling on a final, but the principle remains similar.
The seminar looked into applying for a job in industry, and I'm going to be completely honest here and say... It scared me a little. Don't get me wrong, the idea of actually getting a job is amazing, but the level of skill that is required even for a technically 'simple' job is still so high, that you really have to bring your 'A-Game' with your portfolio. There's so many other people potentially after the same job as you, and you need to be so much better than them to get hired. I think this will be my biggest challenge.
I know soft skills also play an important role in employability, but if I am in a group and we need to get a task done, I know that I'll be easy to work with - I guess that's my big positive!
Analysis of another job:
 |
| Example - Junior placement artist |
They want:
-Someone who works & communicates well in a team = Tick
-Creative person with a passion for games = Tick
-Strong skills in both 2D & 3D = Working towards
-Good portfolio = Working Towards
-Willingness to learn = Ticked a thousand times
-Excellent knowledge in 3ds max & photoshop = Working towards
Everything about this job appeals to me, the only thing that would stop me right now is the fact that I'm not yet at the standard required, hence why I'm on this course trying to get better. I think everyone doing this type of course is aiming for near enough the same goal: To get better than the majority of people in 3D work & 2D work to create amazing new things for games. In order to do that I MUST, continue practicing everything we cover on the course, and widen my knowledge of just about everything there is in terms of software packages, design processes, art techniques etc.
Personal interests this week
For quite some time now, I have been watching online tutorials for Photoshop retouching. I think I have mentioned this in a very early blog, but I've continued with it and it's become a bit part of what I like to do in my spare time now. I am bursting to try out so many things I've learnt on actual images (Not ones from the internet), and a friend of mine allowed me to use some of her modelling photos to 'play about with' and just try different things. I originally started with the intention that it will help with my texturing/photo-manipulation, but carried on because even if it isn't being used for my uni work, I have developed a large interest in this area. I'd like to further my understanding in Photography, lighting, what works aesthetically etc, and hopefully buy a decent camera of my own... The only problem as always in money. So, I don't know when in the future, but my aim is to get a decent camera and take my own pictures from life and edit those using the Photoshop techniques I've learnt and hopefully create some cool images!
Subscribe to:
Posts (Atom)